Overweight or obesity is one of the major problems in today’s world. A lot of us are affected by it up to a certain limit. It may be because of various factors like unhealthy diet, lack of physical activity and sedentary lifestyle, and to be honest, it is much more dangerous that it appears!
Obesity is the underlying cause of various health conditions like erectile dysfunction, diabetes, and various heart diseases. We often take various OTC medications and prescription drugs to tackle this problem. We force ourselves to gyms, go for high-intensity workouts or take supplements to lose some inches around the waist. While drugs and supplements have their own side effects, hefty gym fees can wreck the budget of many among us.
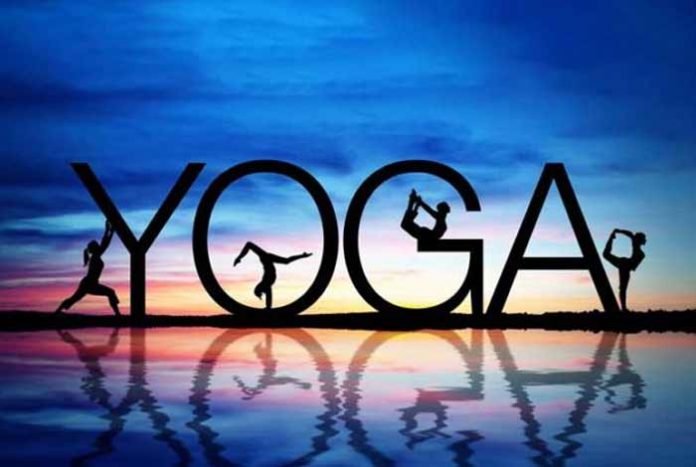
So, is there a way out? Something that doesn’t come with side effects and easy on one’s pocket. Of course, there is, and the answer is “yoga” – completely natural and way more effective.
Yoga is by far the best way to reduce the fat deposits in your body. No, matter which body part you are targeting at, yoga has something for everyone. Be it your face, shoulders, thighs, arms or hips, you won’t be disappointed. The most amazing thing about yoga is that unlike gym, it doesn’t make you feel exhausted.
Here are some yoga postures for weight loss that are found to be most effective for various targeted fat cuts.
For Facial Fat
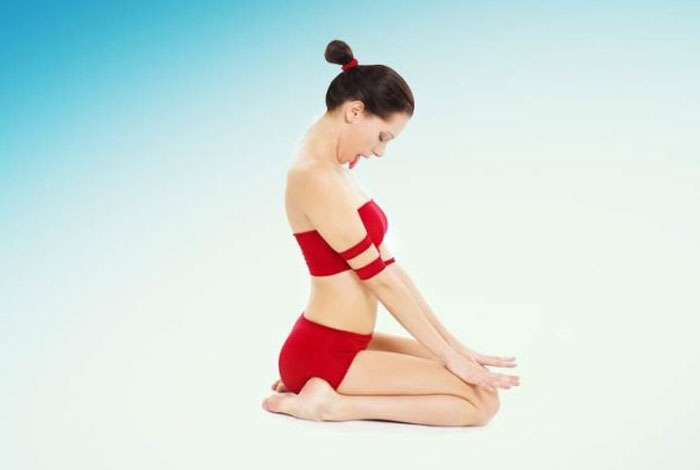
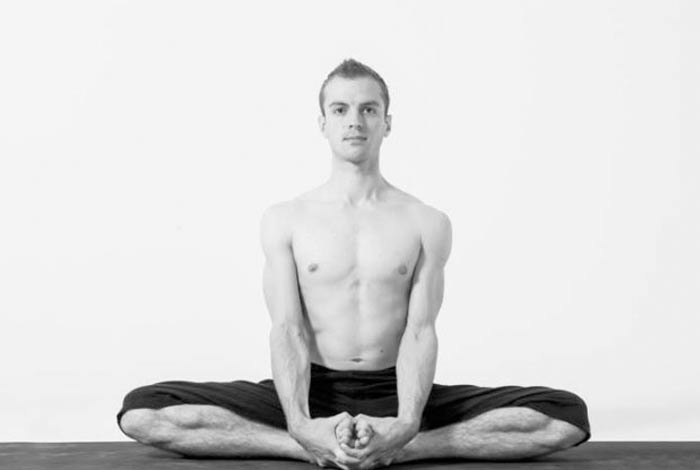
Simhasana:
Also known as the Lion Pose, this asana helps in toning your facial muscles. It is also a great stressbuster. It can be done by anyone irrespective of the age. Doing this asana regularly can vanish your double chin in no time.
How to do it?
- Kneel down, cross your ankles in a way that the perineum should press down on the top of your heels.
- Place your palms firmly on the knees. Your fingers should be stretched out.
- Inhale through nose. While inhaling, open your mouth and stretch out your tongue.
- Keep your eyes wide open and try to look at your nose.
- Exhale through your mouth while making a “ha” sound.
- Roar a few times. Change the cross of legs and repeat several times.
Jalandhara Bandha:
It is ideal for thyroid patients. This improves jaw line. It also helps in improving your concentration power and awakens the inner energy centers.
How to do it?
- Sit down with your legs crossed.
- Place your hands on the knees.
- Inhale deeply and hold your breath for a few seconds.
- Press your chin to your chest.
- While exhaling, lift your body and keep your back straight.
Asanas for Arms
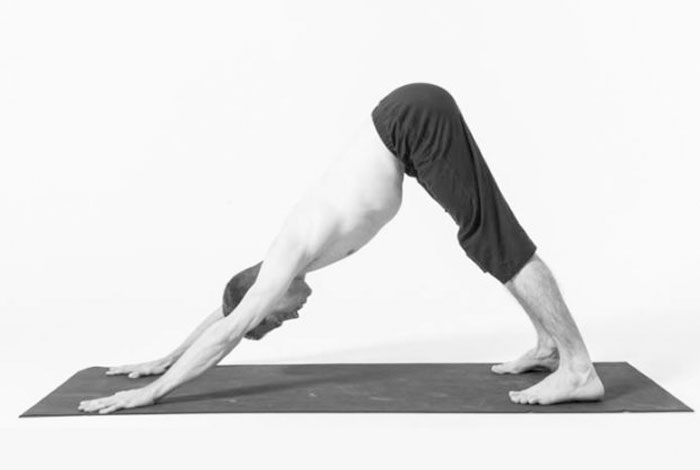
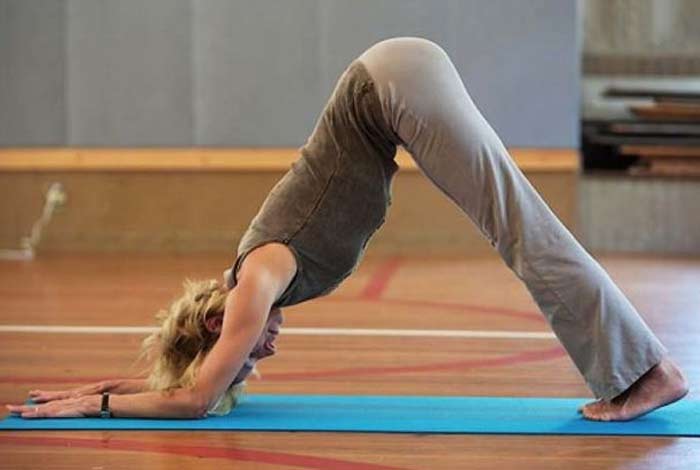
Adho Mukha Svanasana:
It is a very good asana to tone your upper body and the arms.
How to do it?
- Standing on your four limbs, form a table like structure.
- While exhaling, lift your hips and straighten your knees and elbow, forming an inverted “V” shape.
- Your hands and shoulders as well as hips and toes should be in line.
- Press your hands and stretch your neck. You should be gazing at your navel.
- Hold on for some time and then, bend your knees to return to table position.
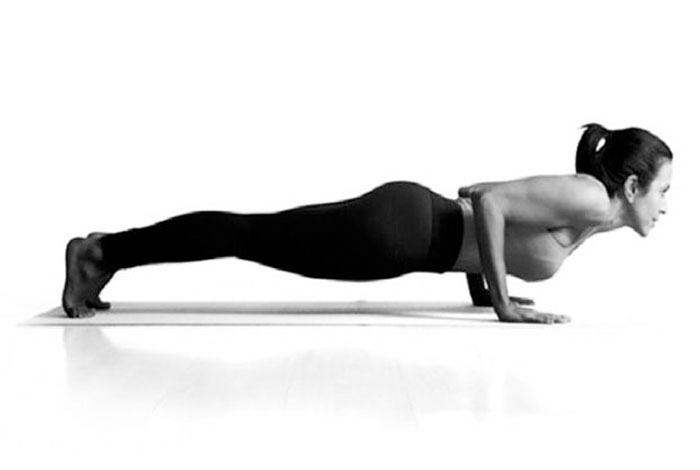
Chaturanga Dandasana:
This asana will tone your arms, wrists, lower back and abdominal muscles. It also strengthens the muscles around the spine; thus, helps improve your posture.
How to do it?
- Be in plank pose; your elbows should be directly over your wrists.
- Lower down your body a bit and keep your back straight.
- Lift your chest. Shoulders should be in line with your body.
- Stay in this position for a few seconds and then repeat.
Ardha Pincha Mayurasana:
In this pose, your body will balance on your arms while you will try to remain afloat. This will help strengthen and tone your biceps, arms and triceps.
How to do it?
- Get on your knees and hands.
- Your forearms should be on the ground, and your shoulders and elbow should be in line.
- While making your legs straight, tuck your toes and lift your hips and back.
- Take 2-3 long and deep breaths as you hold on to this position.
Urdhvamukha Svanasana:
This asana is one of the most efficient and effective ways to train your biceps, arms and triceps. This asana must be performed empty stomach, i.e., the last meal should be around 4-6 hours before performing this asana.
How to do it?
- Lie flat with your belly touching the ground. Make sure your arms are placed beside your body.
- While folding elbows, place your palms on the lowest rib.
- Upon inhaling, lift your knees torso and hips by pressing your hands on the floor.
- Tilt your head backwards and look straight.
- Hold the position for a few seconds and repeat.
For Shoulders and Upper Back
Bharadvajasana:
It helps tone your shoulder blades and improves the flexibility of your torso. It can be easily mastered with practice.
How to do it?
- Sit on the floor; your back should be straight, and legs should be stretched out.
- Bend your knees, bringing them close to your left buttock. Ensure that your body weight is carried by your right hip.
- While inhaling, stretch your spine as much as you can. Exhale, while twisting your torso.
- Your left hand should be on your right thigh and right hand should rest on the floor.
- Slightly bend your back and twist your backbone.
- Stretch your spine every time you exhale.
- Turn your head to look over your right shoulder and hold for a minute.
- Untwist your body while exhaling.
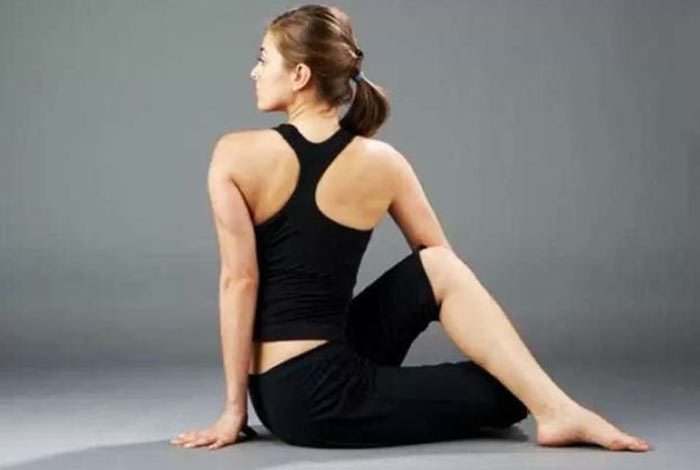
Ardha Matsyendrasana:
This helps in toning your neck, spine and shoulder blades. This also helps in strengthening your abdominal muscles.
How to do it?
- Sit straight while keeping your legs stretched out.
- Bend your left leg over the right one, so that your left foot is next to your right hip.
- Now, put the right leg next to your left knee.
- Twist a bit towards the right and you should be looking over your shoulder.
- Place the left hand beside your right knee and the right hand a little backward.
- Hold on to the position and breathe deeply.
- While exhaling, release the position and be straight.
For Midriff
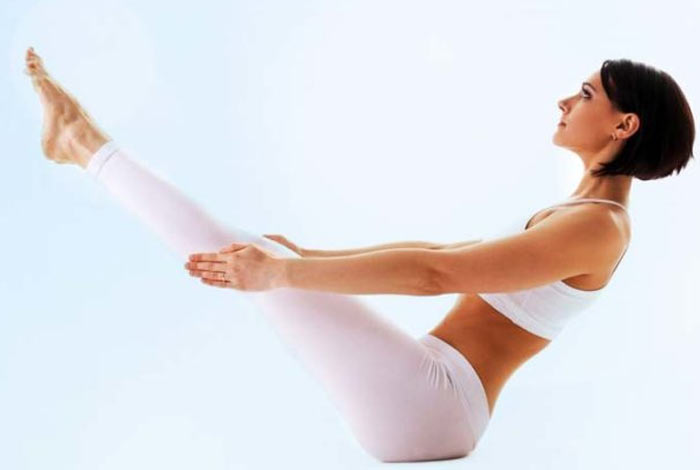
Naukasana:
This asana will make you think of a see saw or a boat. In this, your midriff will be the base for balancing the body. This is very helpful in losing some stubborn belly fat.
How to do it?
- Sit straight, and your legs should be stretched out.
- Your hands should be slightly behind your hips, on the floor. Pull up your body and your back should be straight.
- While exhaling, lift your legs, so that they make a 45-degree angle with the floor.
- Extending your tail bone, move your hips closer.
- Stretch and put your arms in such a way that they are parallel to the floor.
- Make sure your lower abdomen is firm.
- Hold on for a few seconds, breath normally and then, return to your normal position.
Matsyasana:
It is all about your lower body. This is extremely effective for thigh and tummy fat.
How to do it?
- Lie flat with your back straight and legs together. Your hands should be beside your body.
- Place your palms under the hips. Palms should be facing the ground.
- Bring your elbow close to the waist.
- Cross your legs from middle length. Your thighs and knees should be flat.
- Breath in and lift up your chest and head.
- Your body weight should be directly on your elbow. As you will lift your chest, pressurize your shoulder blades.
- Hold the position for a couple of seconds.
Anantasana:
This pose helps in toning the abdomen muscles. The focus areas are the sides of your body. It also improves your digestion and blood circulation.
How to do it?
- Lie flat, and gently turn to your left. Keep yourself steady and firm while you attain this position.
- Raise your right arm while making a 90-degree angle with your body.
- Support your head with your left palm.
- Bend your right knee and try to touch your big toe with your right arm.
- Stretch your right leg towards the ceiling while exhaling. Make sure your arms and legs are perfectly straight.
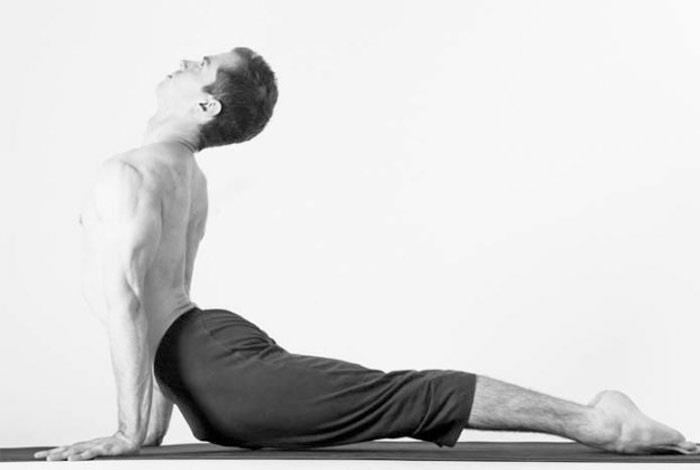
Bhujangasana:
This is one of the prominent poses in Surya Namaskar. This works on your upper body. It acts as a catalyst in burning belly fat.
How to do it?
- Lie flat; your hands should be at the side of your body and toes should be touching each other.
- Move your hands to the front and place your palms on the floor.
- Now, transfer your body weight to your palms, inhale and raise your head and neck.
- You need to replicate a cobra; for this, extend your neck backwards while raising your hood.
- Press your thighs, hips and feet on the floor.
- Hold the asana for some time and then repeat.

For Thighs
Baddha Konasana:
This is also known as the “cobbler pose.” It works best on outer and inner thighs. Fluttering your legs like a butterfly is another variant of this pose. Because of this variant, it is also called “butterfly pose.” It is easy to perform and relaxes your lower body.
How to do it?
- Sit straight with your legs stretched out.
- Exhale and pull your knees towards your pelvic region.
- Press the sole of your feet together and let your knees touch the ground.
- Make sure that the outer edge of your feet is always pressed to the ground. For this, hold the big thumb of your feet with your hand thumb and forefinger.
- Hold on the position for some seconds and repeat. Make sure that your pubis and tailbone are at equal distances from the floor and your back is straight.
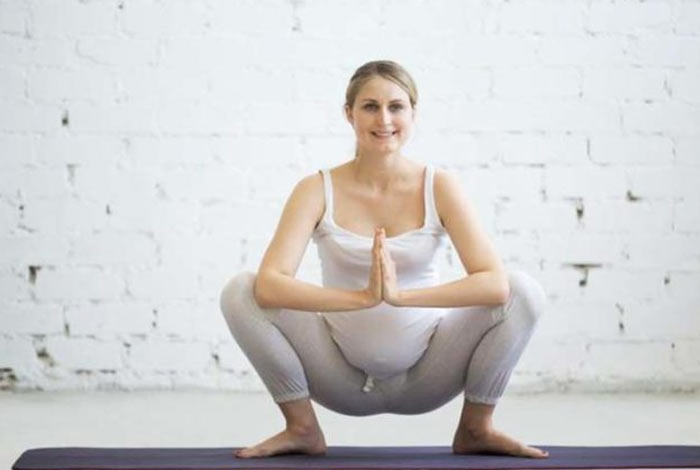
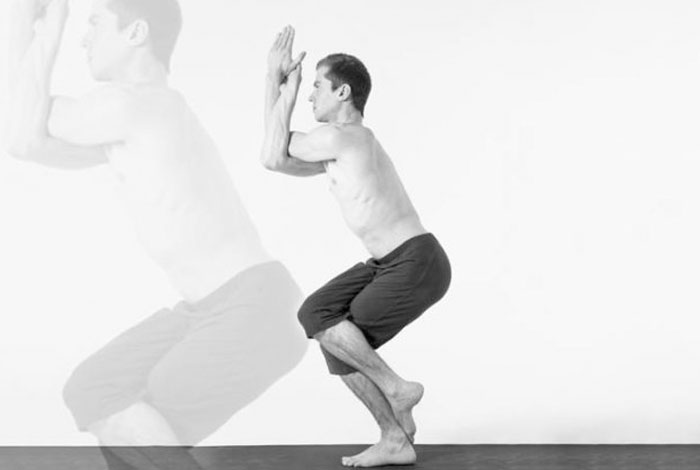
Malasana:
It is the best position that counters the negative sides of sitting all day and accumulation of lower body fat. In this, your groin, thigh and hip muscles are stretched out. It tones your inner and outer thighs and improves overall flexibility.
How to do it?
- Begin with squatting. Keep your feet close to each other with your heels on the floor.
- Spread your thighs and place them wide apart.
- Lean forward while exhaling. Your torso should fit in between your thighs.
- Your palms should be in anjali mudra and elbows should be pressed to the inner thigs.
- Hold the position for a while and then, repeat.
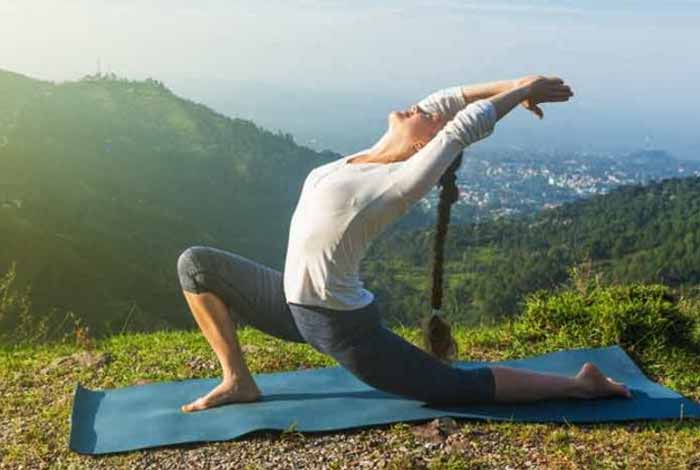
Anjaneyasana:
This is a basic lunge- pose. It stretches the legs, thighs and hamstrings. This asana tones your hips and ankles. It also helps release stress and tension.
How to do it?
- You should start by getting into the position of Adho Mukha Svanasana. Now, exhale while placing your foot in front of you, just beside your right hand. Make sure that your knee and ankle are in line.
- Lower the left knee to place it on the floor behind your hips.
- Lift your torso while inhaling. Raise your hands over your head in a way that your biceps touch your ears and your palms should be facing each other.
- Exhale while lowering down your body and stretching forward. You should feel a good stretch in the frontal region of your hip flexors and your legs.
- Pull your tailbone to the ground. Lower back should be extended, so as to engage your spine. You should be gazing your backside.
- Hold the pose for a few seconds and repeat.
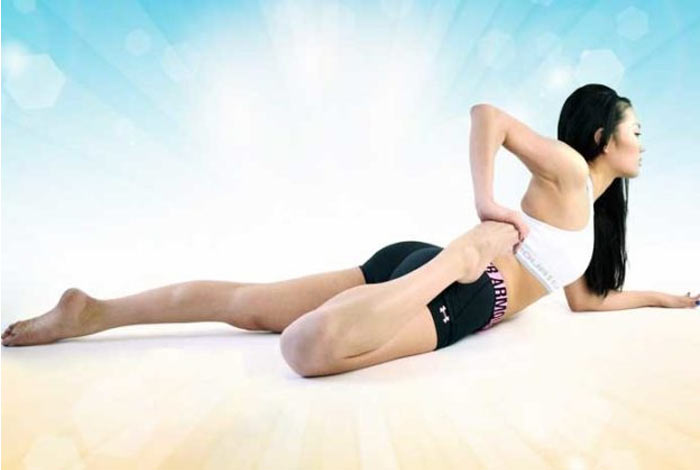
Ardha Bhekasana:
It is also known as “half frog pose,” and is one of the most difficult poses. However, it will give you amazing results. It affects your quadriceps, hips and hamstring muscles. It also boosts the blood circulation.
How to do it?
- Lie down on the floor, with your belly facing the floor. Lift your torso and head by pressing your forearms against the floor.
- Bring the heel towards the same side of your hip by bending your right knee. Get the required balancing support from your left arm and hold your foot with your right hand.
- Pull your foot with your hand towards your hips. To add difficulty, press it towards the floor once your heel touches your hips.
- Hold the position for a few seconds, and then repeat the same with other leg.
For Hamstrings/Calf Muscles
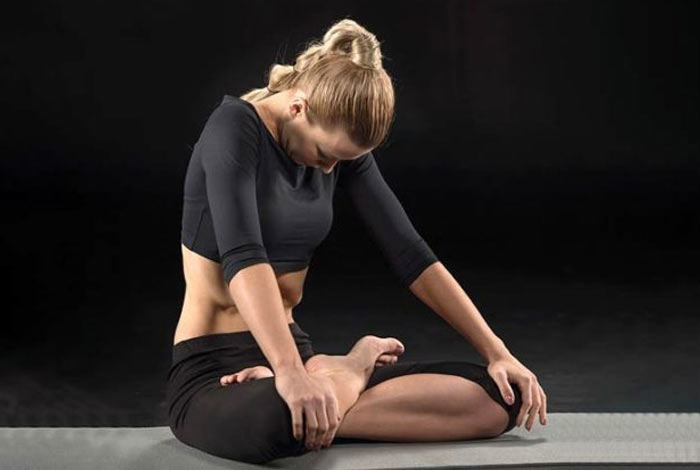
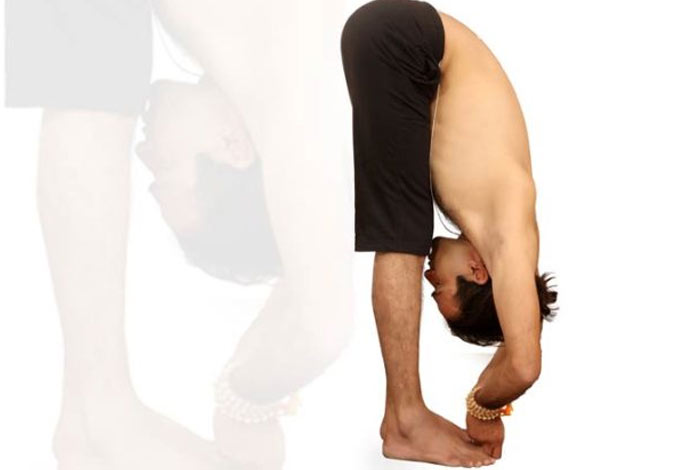
Padangusthasana:
It is also known as the “big toe pose.” It is one of the best asanas to tone your calf muscles. It strengthens back, legs and thighs. It also boosts the functioning of kidney and liver.
How to do it?
- Stand straight with your feet parallel to each other. Make sure to keep your feet six inches apart.
- Lift your kneecaps outwards by contracting your thigh muscles.
- Bend forward and try to touch your knee with your forehead.
- Hold the big thumb of your feet firmly with your fingers.
- Lift your torso back while inhaling and then, repeat.
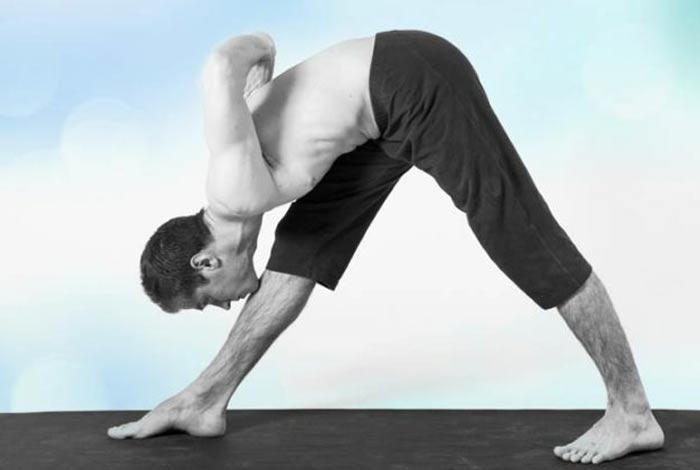
Parsvottanasana:
This is also known as “pyramid pose” or intense side stretch pose as it stretches the sides. It strengths calf muscles, hamstrings and quads and also tones your legs.
How to do it?
- Place one of your legs in front of your torso and the other behind you. Your hands should be on your hips and your legs should be straight.
- Lengthen your torso while you inhale.
- Bend your torso to the front till it becomes parallel to the floor while you exhale. Be sure that your hips are in square.
- Continue to stretch your spine and hold the position for a few seconds.
- Release yourself by lifting your torso up gently. Repeat the same.
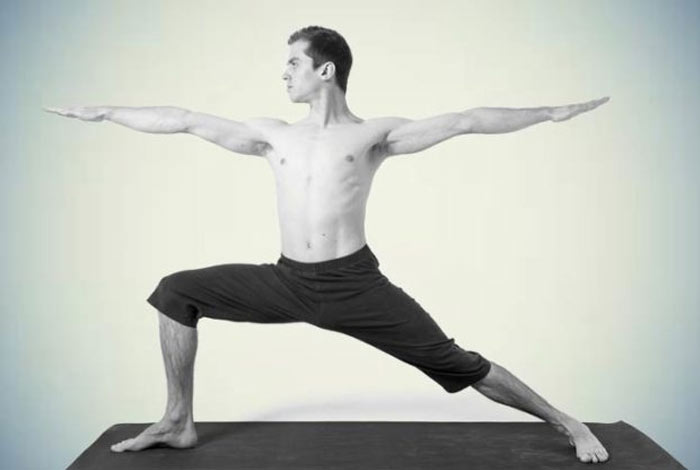
Virabhadrasana 2:
Also known as “warrior 2 pose,” it is a revitalizing pose and help improve stamina and stretch the hip muscles. Apart from just toning and strengthening your muscles, it has a lot of added benefits as well.
How to do it?
- Stand straight with your legs 3-4 feet apart.
- Turn your left foot inside by about 15 degrees and your right foot should be at 90 degrees outwards.
- Your arms should be lifted sideways, parallel to the ground at the height of the shoulder.
- While exhaling bend the right knee so that your right ankle and right knee are in a straight line.
- You should be gazing to your right.
- Stay in this pose for a few seconds and keep breathing.
- Come out of this position by inhaling and dropping your hands while exhaling.
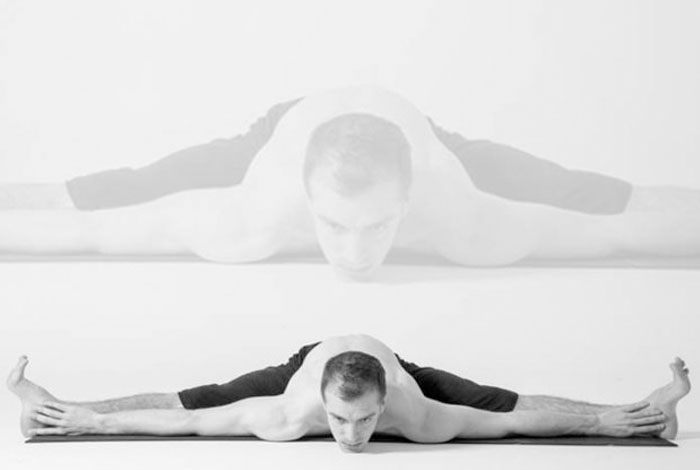
Upavistha Konasana:
This is similar to a stretch. It is also known as “Wide angle seated bend pose.” This releases tension in the torso and tones your hips.
How to do it?
- Sit straight and stretch your legs to form a 90-degree angle with the pelvis.
- Your palms should be on the floor behind your hips.
- Hold on to the position for a few seconds and then, release by bringing your feet forward.
For the Hips
Garudasana:
It is also known as the “eagle pose,” and it engages your legs, arms and thighs. It pushes your torso and strengthens your core and hip muscles.
How to do it?
- Stand straight, bend your left leg a bit and wrap your right leg around it.
- Raise your left hand up and wrap your right hand on the left.
- Be sure that your elbows are making at a 90-degree angle.
- Maintain the balance and bring down your hips.
- Hold the pose for a while and then, release gently.
- Repeat a few times.
Ananda Balasana:
It is also known as “happy baby pose.” It is one of the best asanas in yoga for weight loss. It stretches your lower body, especially the hip area. Groin, inner thighs and calf muscles are also toned with this asana.
How to do it?
- Lie down on the floor with your back facing the floor.
- Raise both your legs above your torso and hold your foot firmly with your hands.
- Breathe deeply, hold the position for a few seconds and then, release gently.
- Repeat the same several times.

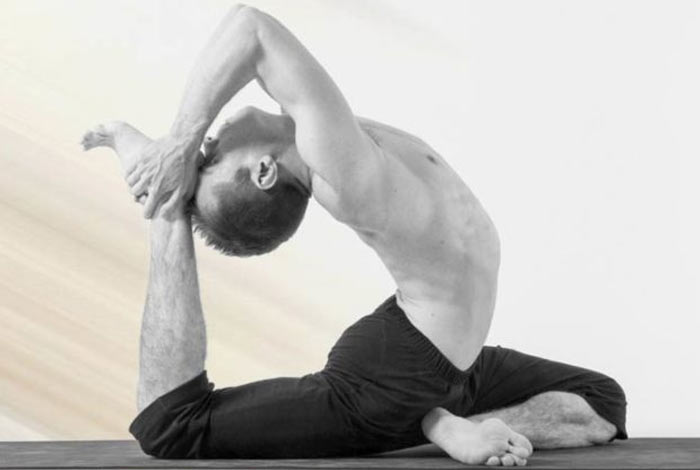
Rajakapotasana:
It is also known as “king pigeon pose.” It helps in strengthening the hip muscles.
How to do it?
- Your knees should be right under your hips and hands should be in front of you.
- While raising your right knee, slide it forward so that it rests behind the right wrist. Your right shin should be under the torso.
- The left leg should be slid backwards. Your knees should be straight, and your thighs should be on the floor. Your right heel should be in front of your left hip.
- At this point, extend your left leg so that it is not inclined to the left.
- Take a deep breath and while exhaling, bend your left leg. Bend your torso, and stretch your head backwards, so that it touches your foot.
- Lift up your arms and bring your foot to the head with the help of your hands.
- Be straight and stiff. Hold on to the position for some time, and while releasing, bring your hands and knees back to the floor.
- Repeat the asana for several times.


")


